
So far, since I started my "Tribal Themed DIY Extravaganza", I've shared a whimsical DIY: Doily Dream Catcher and a fanciful DIY: Baby Feather Headdress. Today, as I come to the end of my "native" obsessed DIY attempts, I conclude with my biggest tutorial yet; How-To Assemble A No-Sew Teepee! That's right, no sewing needed!! For those who have zero needle-crafting skills like me, these two precious words are music to our ears. A traditional teepee was the preferred tent used by the Plains Indians and have now found their way to the top of almost every child's wish list. I can definitely see why, as they make for the perfect oasis for your infant, toddler and/or school-age child to escape into a magical world of imaginary play or just simply cozy up with a few of their favorite books. The best part about them is how easy they are to set-up and disassemble, allowing for effortless portability. Whether they be used indoor to add a touch of whimsy to your child's nursery, bedroom or playroom or for that perfect outdoor camping spot in the backyard, they are a wonderfully convenient and hassle free way to entertain your little one for hours! I have wanted to add one to my daughter's play area for the longest time just never found the right time to make the big purchase, so I decided to create one myself (with the help of my handyman husband of course). After browsing several tutorials I found they all used the same method to create the structure, however when it came time to fit the covering I decided to do away with dimensions and just use my eye-balling method. ;) With out further ado, here is my step-by-step on How-To Build A NO-Sew Teepee!


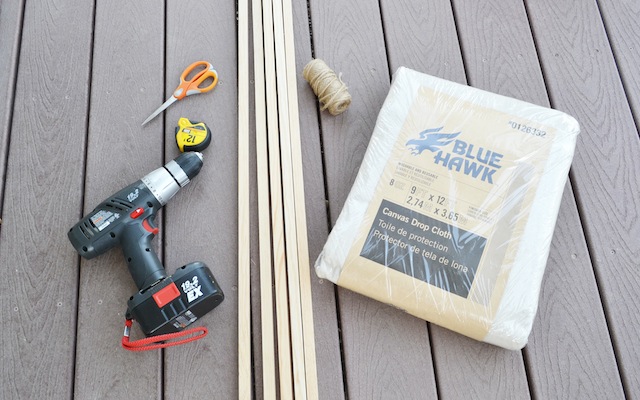
Supplies:
Structure:
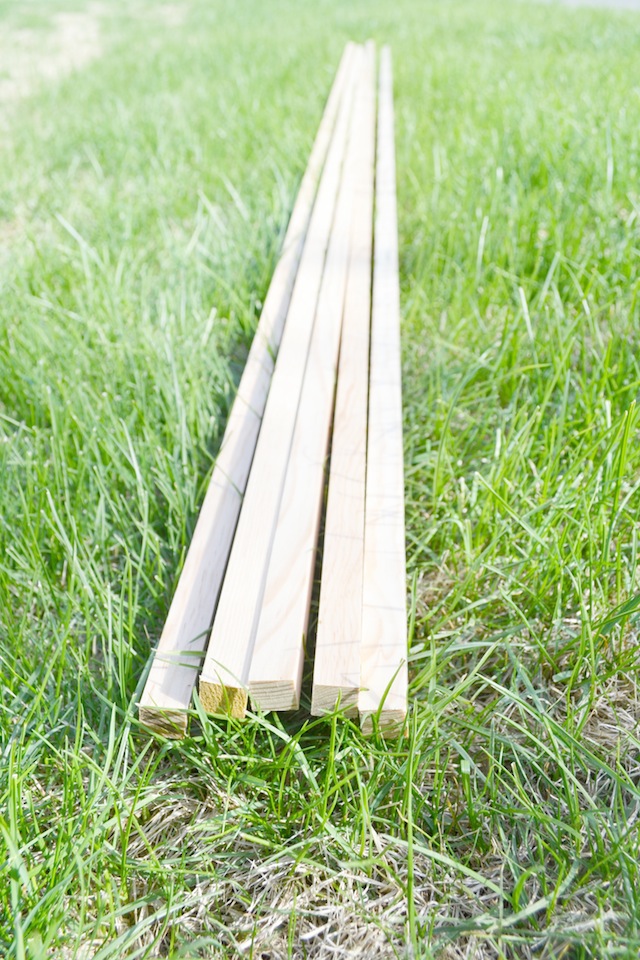
* (5) - 11/16" X11/16" X 8ft wooden poles
* Twine
* Hand held Drill
* Tape Measure
* Pencil
* Scissors
Covering:
* 9X12 Painter's Canvas Cloth(tarp) (This makes a 4ft-5ft standing area inside Teepee Tent, if you want a higher version, you may want to purchase a larger canvas)
* 10 count Grommet packet with kit
* Boot String bundle


Instructions:
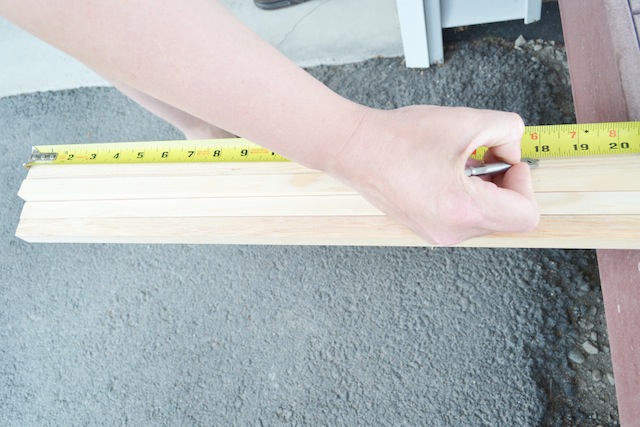
Part I - Structure:
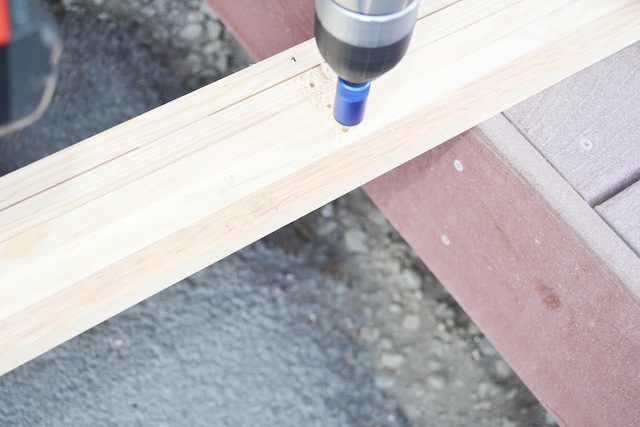
1. Measure and use a pencil to center mark 18" from the top of all your wooden poles

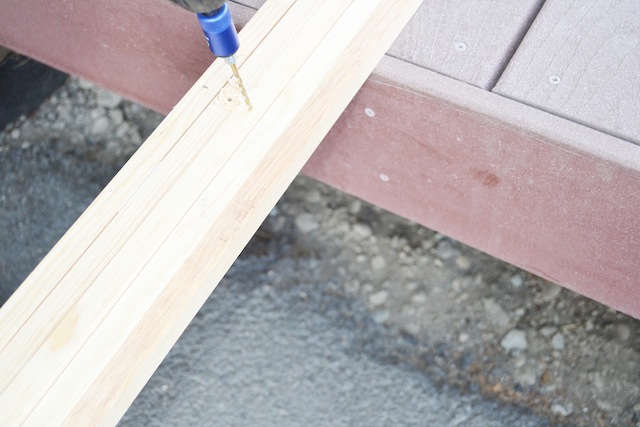
2. Drill a 1/4" hole through each marking on all of your wooden boards


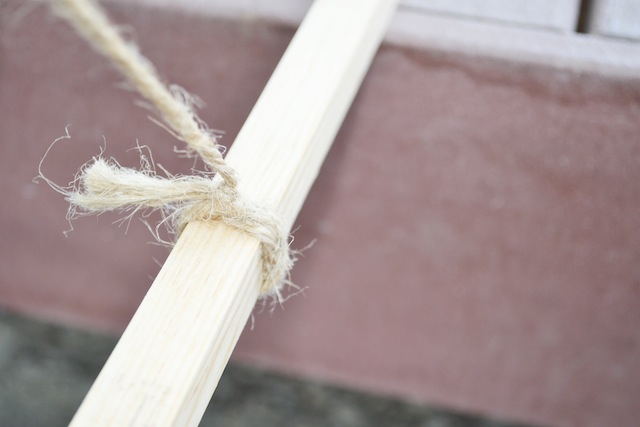
3. String your twine through each hole, tying a knot on each board as you go. (see photo below)


4. Stand your wooden poles up, align the holes and tie with a loose knot
5. Begin spreading the poles out, positioning each one to create your preferred width and height. (You may need to elicit help with this step)

6. Once you have the teepee shape you want, wrap the top of your teepee with twine as many layers as you need to tightly secure.


Part II - Covering:
1. Fold your tarp in half giving you a 6ft X 9ft. For the collar portion, measure a 6" radius from from the tip of the folded point and mark a line from left hem to the right hem,cut along that line, creating a collar to fasten around teepee structure (underneath your twine fastening). For the skirt portion of your canvas covering, measure about a 6ft radius from the tip of your corner fold. Mark a line from the folder edge over to the corner of the open corner edge, creating a semi-circle (This will be the bottom skirt of your covering).


++ Side Note: The bottom of the front opening will hike up a little, it may drape as to resemble a shawl collar cardigan. So do not expect the hem to drop all the way to the floor.
If you are not a measuring kind of person, you may simply cut the collar out, as seen in photo directly above. Then follow these steps.
1. (Not Pictured) Wrap your tarp (right side out) around your teepee structure about 6" below your twine fastening. Here you can adjust your height by spreading the legs out for a fuller size or bring in for a more slender/taller teepee.
2. (Not Pictured) Safety pin the opening shut (or have your helper hold) in position while you draw a line around the bottom "skirt"marking your preferred length all the way around.
3. Cut along your marked hem ( I would even cut a bit outside your line as it's always easy to trim or tuck under than it is to add length).
4. Starting at the top of your opening, add 5 grommets on each side.
5.Once your tarp is wrapped around your structure, then string your boot strings through your grommets to secure your closure.

7. Add a cute rug or blanket and lots of pillows for comfy lounging.

YOU DID IT!!
You have now created your very own No Sew Teepee!
Your Beautiful Homemade Hide-Away Awaits You, I MeanYour Precious Little Boy or Girl!
 |
| As you see here, I draped my hemmed opening back and pulled the canvas a bit tighter at the bottom. |

Be sure to visit my tutorials on how-to create a Doily Dream Catcher and Baby Feather Headdress!
Update:
Since the (above) post we have moved our teepee into my daughter's nursery! We ended up trimming the top of the teepee down and lowering the twine fastening, just so it didn't overtake the space too much. Here are a few photos of it in her little space :)


I love this! Such a unique idea! Visiting from the Inspire Me blog hop! Feel free to also link this one up at our Red, White & BBQ Ladies Only Blog Share link party which is now live! :)
ReplyDeletehttp://mommifried.com/ladies-only-blog-share-link-party-red-white-bbq/
Thank you for stopping by Crystal!! I am now linked up at "Ladies Only.." Thank you for the invite!
DeleteWow! Love this. Thanks for sharing :)
ReplyDeleteAnne
{The Pink Momma}
I'm glad they are not just my favorite, lol!! Thank you so much for stopping by and for your sweet complement :)
ReplyDeleteHello awesome fun!! I have a child whose room is done in Native American (and Spiderman, lol, never mind ;)) and this would be a perfect addition!
ReplyDeleteYou can never go wrong with Spiderman, lol! Thank you for stopping by!! I am now your newest follower! :)
DeleteGOODNESS I love this!!!!
ReplyDeletexo
Thank you Christina!!! :)
DeleteStopping over from the Blissful and Domestic link party! I love this. It was just what I was looking for my boys!! Thanks for sharing!!
ReplyDeleteStacy
www.theprojectpalace.com
Thank you for stopping by Stacy!!! It was a fun project that certainly isn't as hard as it looks!
DeleteLOVE!!! This is so awesome!!!
ReplyDelete:) Rebecca
Thank you Rebecca!!!
DeleteHi Melissa, I'm a new follower from the Friday hop. Love, love your blog's layout! Very chic but still classy! Also the photos!
ReplyDeleteI'd love it if you can follow me back :)
xoxo
Ochi
ochibernadas.blogspot.com
Thank you for stopping by, I will be sure to return the visit :$
DeleteI love this! Great tutorial! I would love to make one for my kiddos when I find the time. About how much did this project cost compared to those $$$$ that you can buy?
ReplyDeleteThank you Heather!
DeleteThat's a good idea to put the total cost!! I will have to get out my receipts and add the total!
Off the top of my head, total cost guesstimate would be around $60.00 vs. $140.00-$200.00 retail (not including shipping)
That's awesome!
Deletethat's a great DIY! My shop has teepees ready to be posted after our vacation! These sound much simpler to make! no sew! what a brilliant idea!
ReplyDeleteYEY!!! I can't wait to see your teepees! I bet they are amazing and will sell like crazy!! I just LOVE your product! :)
DeleteThere are no words for how amazing this is! I can't get over the fact that it was a no-sew job! I think I'd hide out in this all day with a good book!
ReplyDeleteThanks for linking up with Much Ado About Monday this week. Have a great weekend! :)
~Emily
www.huckleberrylove.com
Thank you Emily!! Yes, "no-sew" are my two favorite words,lol! It was so easy to make and assembled :)
DeleteThanks for stopping by :)
Just stopping by to let you know you've been featured this week at Living Better Together! I hope you'll stop by after the party starts at 8pm to grab your button and link up again!
ReplyDeletehttp://www.livingbettertogether.com/2013/07/tgif-link-party-no-4_11.html
Rebecca
Wow! So exciting!! Thank you Rebecca! I will certainly link up tonight! Thank you so much for the feature compliment!
DeleteThis tutorial is SO EASY to follow. I think I am going to make it this weekend for me... I mean MY DAUGHTER! LOL! Cute and easy. My 2 favorite things for a DIY. :) Thanks for sharing.
ReplyDelete~Kelsy
http://looseendscraftblog.com
Yey! I'm so glad how-to comes across easy! You should totally make one! I hope you will post it so I can see!! :D
DeleteStopping over from Living Better Together link party! Teepee looks absolutely amazing, brings back nice childhood memories :)
ReplyDeleteThank you Sylvia! They are soooo much fun, even for adults to hideaway in ;)
DeleteOh my goodness, I love your DIY blogs! I'm gonna have so much fun looking at your posts!
ReplyDeleteElena
elle-alice.blogspot.com
Thank you for your sweet words Elena! Thank you for stopping by, I look forward to visiting your blog as well! :)
DeleteYou are too cute! You don't use a sewing machine, but a drill! That's a lot more scary to me! LOL Great tutorial! :)
ReplyDeleteHa ha - I wish I knew how to use a drill! I had to enlist my husband in on this one. One of these days, I will scrounge up enough courage to learn how to use both! (I hope :/)
Deletehi! I was wondering if this tutorial would be possible with a different fabric? Like a lighter, sheerer one?
ReplyDeleteHI Kelsey! I'm sure a sheer fabric would work - just may have to pay attention to the rough edges (unless you want to sew/hem them) - sheer fabric may fray a little.
DeleteI cant tell from pic, does it close completely? Supplies have been purchased, starting project this week. Thanks for the inspiration for my son Wyatt's 1st xmas:)
ReplyDeleteHi Stephanie! It can, it all depends on how wide your structure stands. You can always just wrap your painter's cloth around the structure and if the cloth does not wrap completely, then you could always take it back and get the bigger size. It truly just depends on the width of your structure though :)
DeleteHi Melissa, what a fabulous idea! I couldn´t wait to get started! I used 1x2x8´s instead of your 11/16" for the poles, to keep costs down and fit the budget our grandma provided for the production. It works great, we even keep a set of poles at the grandparent´s house, so when we go, all we have to bring is the fabric. Keeps both of them (4 and 1) busy for hours. What a great gift for just about 30 $! I posted pictures and your blog on my google+ page for my friends to watch, hope you are ok with that.
ReplyDeleteWonderful Peggy! I'm so excited that it worked out so well for you!! I am thrilled that you shared it on your google +! Thank you again for your sweet words and Congrats on a Successful DIY!! :)
DeleteQuestion! Before cutting my canvas I wanted to mAke sure I was doing this right! Fold it length wise? It isn't looking right to me.
ReplyDeleteHi Hailey! If you are using the same size painter's canvas as I did, you want to fold seam to seam keeping your 12ft length with your 9ft width folded in half. This will give you enough length to modify after wrapping around your structure. Then you cut a small semi circle at the top fold. Wrap that around your structure like a coat or blanket. Secure or have helper hold it in place while you trim the excess canvas off the bottom. I hope this makes sense. I will try to add a diagram to better explain today. I hope this helps a little more.
DeleteHailey, I added a little diagram that will make more sense. :)
DeleteI am in the same boat, How many times did you fold this? What is gft width? I am afraid to cut it as mine looks like a rectangle, not a pie piece.
DeleteHi Sonya! I tried wording it differently to help. I am thinking of adding a video so that it makes more sense. Sometimes, I'm the worst at using the correct words/terminology to explain. lol! Let me know if this helps any:
Delete++Fold your tarp in half giving you a 6ft X 9ft. Measure about a 6ft radius from the tip of your corner fold to the very end of the open corner edge. Mark a line from the open corner edge over to the folded edge, creating a semi-circle (This will be the bottom of your covering). For the collar portion, measure a 6" radius from from the tip of the point and mark a line from left hem to the right hem,cut along that line, creating a collar to fasten around teepee structure (underneath your twine fastening) . Then wrap around your teepee structure. (as seen in photos)
Please see new diagram within post to hopefully better explain the canvas covering.
DeleteI bought the same drop cloth as the one pictured here. But I was wondering if yours was pieced together? I just opened mine up and it looks like two pieces were put together to make one.
ReplyDeleteHi VIcki!
DeleteMine was just one huge cloth. I purchase mine from Lowes - if that helps any :)
I'm totally going to make this for my daughter! Where did you find boot string? I can't find any. Thanks!
ReplyDeleteWonderful Stephanie! I found booth string at Hobby Lobby! I'm not sure exactly what aisle (it might have even been an end cap) They do have them though. I would ask a store clerk :)
DeleteMy girls have so much fun playing in their Teepee! Thank you Melissa for inspiration! Here is how ours turned out ---->http://www.munchkintime.com/how-to-make-no-sew-teepee-easy-diy-video-tutorial/
ReplyDeleteLove this! Will a 5x20 tarp work if I cut it in half and seam it? Does it shrink if it gets rained on?
ReplyDeleteI'm sure that will work great! We haven't it left it out in the rain so as far as shrinking goes - not too sure about that?
DeleteThis is adorable and I'm totally making one for my toddler's "big girl" room next week! Could you tell me the diameter of the bottom of the finished product possibly? Trying to figure out if it will fit as is or if I will have to adjust the measurements.
ReplyDeleteI'm not quite sure of the bottom measurement. I will get back to you! :)
DeleteStephanie! I believe I just played around with mine. I built the frame to fit into my space and draped the tarp around the frame, cutting off an extra fabric. It's totally made to fit any space. If you need to trim your poles too, to help thats always an option as well. I would just play around with your space.
DeleteLove this but trying to print the directions out is beyond me, HELP! I have tried to copy and paste, that doesn't work. I so want to try this but must be doing something wrong, I don't see a print instructions out button????
ReplyDeleteI unfortunately don't have a button to print out instructions. Might be easier to maybe write them out or have your smart phone handy.
DeleteJust a head's up and question...are you SURE that your drawn picture of the folding is correct? I made this myself and for SURE had to fold the cloth in half hamburger style to make it 6x9 when folded...not hotdog style...you know, not long and skinny 4.5 x 12. I will send a couple photos to show you both ways draped on the frame. My instincts told me NOT to fold it the way you showed. You need the 6 foot sides to be your doorway and the larger circumference around the bottom or you will have a tiny little short teepee with a bunch of wasted cloth on your hands. Great tutorial though! I think you cut it right in making it yourself, just forgot when you drew it out. THANK YOU! Mine turned out just incredible!
ReplyDeleteThank you for pointing that out! I honestly need to take it down and measure because I can't 100% remember :/ I removed the drawing for now. I'm so glad yours worked out for you though!! :) Thanks again! :)
DeleteI can confirm Cheryl Taylor's observation- I'm not mechanically minded or an experienced crafter and followed the instructions exactly as they were written. After folding the 9 foot length in half, keeping the 12 foot length, I made the cut. It didn't fit the structure, the material wasn't long enough in the front and there was a ton of excess material along the bottom. I was so confused and definitely second guessing my ability to follow directions until my husband showed me Cheryl's comment. I was able to make the adjustment and the original cut was removed when I cut the hem. No harm no foul, but you definitely need to fold the 9x12 in half hamburger style, not hot dog style. :-) I love the finished product!
ReplyDeleteMy apologies for the miss-information on the fold. I'm glad it worked out for you at the end. I thought I corrected it, apparently I missed another "folding" instruction. Again, glad you were able to remedy the fold :)
DeleteHi - any suggestions where to buy the poles?
ReplyDeleteI'd love to make this for my kids.
We got ours at Lowes ;)
DeleteHow easy is this to fold up?
ReplyDeleteHi. How easy is this to fold up? And How much did the poles cost at Lowes?
ReplyDeleteIt's really easy to fold up, you can't really do much about the length. However, it can be stored underneath your standard bed or in a standard closet. The poles were a couple bucks each. We purchased them at Lowes. Hope this helps!
DeleteI am wanting to make this for a baby shower and I have never used grommets before. Can you explain that step a little? Thank you!!
ReplyDeleteYou can find grommet kits at any craft store. All you will need is a hammer and cement ground to hammer on. It's very easy once you get going. Look for the kit thought as it probably will explain in a more clear way than I could ;)
DeleteThank you so much for this tutorial! I just built one for my twins Native American themed room and they've been sleeping it it every nap and every night!!! It's huge and it's perfect!!
ReplyDeleteThat's so wonderful! Thank you for sharing! I'm so thrilled your sweet babies are enjoying their parents hard work ;)
Delete