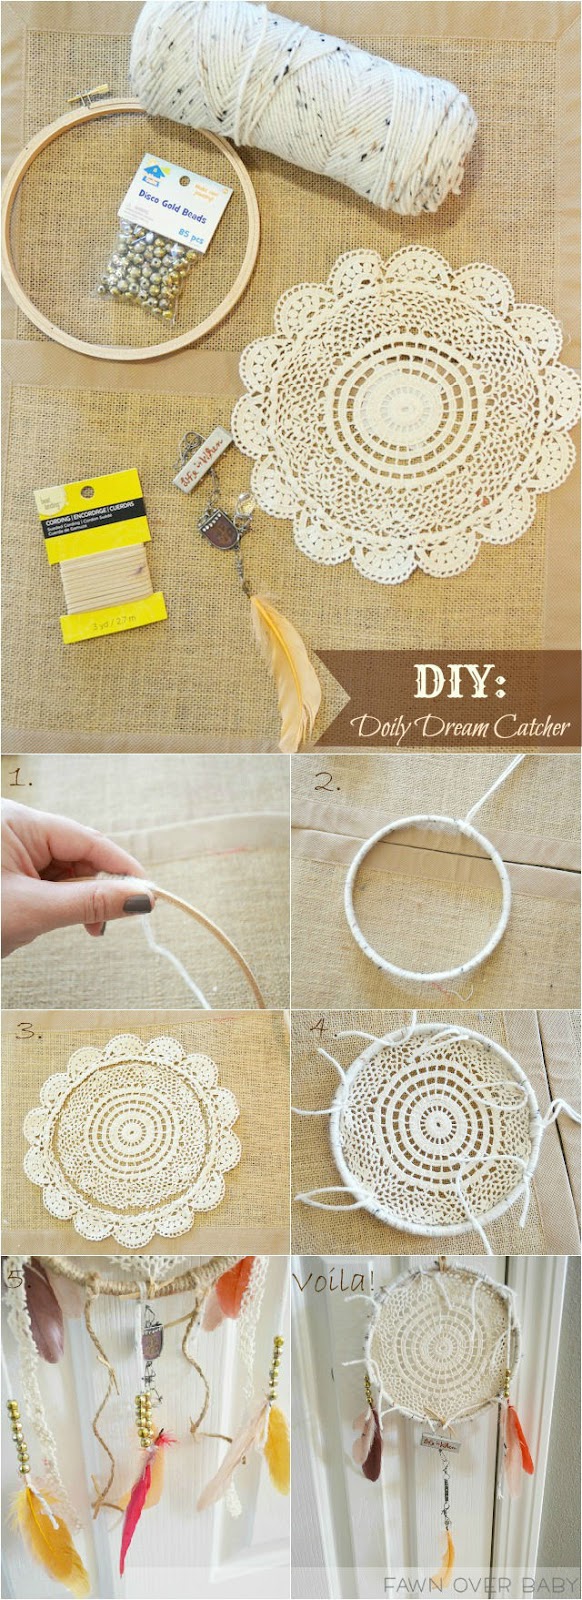
Hello My Dears! Today I am sharing one of my many DIY projects that I have been working on this past week. With the tribal theme taking over my collection of inspirational designs and photos that are neatly filed away on my computer, I couldn't help but jump on the bandwagon and start incorporating it into my daughter's sleep and play area. Since McKenzie does not have a mobile anywhere in her nursery, I decided to start off my DIY extravaganza with a Dream Catcher. Dream Catchers originated in traditional indian beliefs and were hung above one's bed(mostly children) to protect them from bad dreams. There are a ton of wonderful Dream Catcher tutorials out there, however a lot of them include the very cool webbing technique that is threaded through the center. If you are like me and don't have the time to learn how-to web, many DIYers are using doilies! What a genius idea right? After searching and searching, I came across this awesome tutorial from Calico Skies and in an instant this overwhelming diy-confidence came over me and I dove right in! Here is how I assembled mine with a little help from Lauren at Calico Skies of course.
Supplies:
- Doily - Smaller size is preferred. I found mine in a vintage cream color at JoAnn's. If only whit is available, see Lauren's tutorial
- Craft Hoop - Metal is preferred, however, all I could find were the wooden embroidery hoops at JoAnn's (you get to make two out of these)
- Yarn or twine - I used a natural looking yarn for one and twine for the other.
- Beads - color and shape of your liking. Make sure the hole is big enough to fit yarn, twine or leather cord through.
- Leather cord - I went with a lighter shade.
- Feathers - can be bought packaged or individually at JoAnn's and Michaels
How To:
- I started by simply wrapping the yarn tightly around one of the wooden hoops-tying at the end
- I then created my hanger by tying a loop knot with yarn or leather cord at the top
- I had to cut the trim off of my doily as it was too large for my hoop.
- I placed the doily in the center of the hoop and began stretching and tying four outside edges of the doily to the loop. (I just left the extra tails from the knots to create a more frilly look.
- I then tied and hung leather strips, twine and yarn from the sides and bottom of the loop and attached beads and feathers or any other embellishments of your choosing(The more, the merrier)
- Voila! You are now ready to hang your dream catcher anywhere your heart desires.
If you do not have the time or interest in making your own, visit Moons & Junes on Etsy. Shop owner and talented mom, Shayla, makes and sells amazing dream catchers as well as beautiful mobiles to adorn your child's nursery or bedroom!


Hello from friday blog hop. My baby has one like this. But now its looking very old. So good idea with this one.
ReplyDeleteThank you stopping by Hannah! These are by no means a true dream catcher, however, I love that I was able to at least make a "look-alike" lol! I still plan on purchasing from Moons & Junes they are so lovely
Delete:) you're lovely.
ReplyDeleteI love how fun and playful yours turned out!! I might snag some of your techniques for future projects. ;)
Thank you Shayla, they are far from perfect. I still plan on purchasing one of your FANTASTIC products as soon as we get settled in our new place. :)
DeleteOkay so I have to admit that I don't normally care for native American inspired art. It just hasn't ever spoken to me. That said, I love these dream catchers! I love how soft they look. A dream catcher for baby is such a cute idea!
ReplyDeleteThank you Heather! I just started noticing them being used in nurseries and I love the softer designs. It brings such a whimsical and earthy look without overpowering a space.
DeleteThank you for stopping by!
This is so darn cute!!!!
ReplyDeleteThank you Christina! I have to say I am pretty proud of them, considering my DIY success rate is pretty embarrassing, lol!
DeleteThank you for stopping by! :)
Wow! That seems so easy, but looks so beautiful! Great job!
ReplyDeleteThank you Alex! They were simple simple simple to make! And the fun thing about them is, you can keep adding onto them! :D
DeleteLove this and will be making one for Riggs' room very soon!
ReplyDeleteYEY!!! Thanks Whitney!! I'm glad they came across fun and easy!! I can't wait to see Rigg's! :)
Deleteso pretty! When I was younger we made tons of dream catchers.. I love your take on them... more grown up :o) Emily @ Nap-Time Creations
ReplyDeleteWhat a cute project! I've linked to you on the FaveCrafts blog :)
ReplyDeletehttp://www.favecrafts.com/blog/fc/link-love-diy-dreamcatcher/