Showing posts with label Wall Decor. Show all posts

6/16/14

Wall Decal Tree Product Review & Discount Code + DIY:Framed Chalkboard

Hello Friends!! I hope you all had a wonderful Father's Day weekend! I have to say this weekend was a slow paced one for us, which is nice since we've spent our last few On-The-Go! With us just hanging around the house, a fun little product from the wonderful online shop Wall Decal Tree came in the mail just in time for our family fun at home. 


Before I get into our exciting new playtime gem, I want to tell you a little bit about the shop from which it came, called Wall Decal Tree. This charming online store offers a massive assortment of home decor decals that will liven up any space in your home or office. They are known for their fanciful Tree as well as Nursery & Kids Wall Stickers. You will also find an array of modern graphic wall art that will meet anyone's style or taste. For those customers that like the word "custom", Wall decal Tree has a "create your own quote or text"option allowing for custom decor solutions that can easily be changed out or removed later.

Here is a little sample of what you will find!
Since my little McKenzie's Nursery is pretty much complete, I am know focusing my attention on her "temporary" playroom. These days Kenzie is obsessed with chalk and drawing on anything in her path (i've had to invest in A LOT of magic erasers), so when Wall Decal Tree kindly allowed me to choose our decal of choice, it was a no brainer - Chalkboard Wall Sticker! My thinking is that maybe this will give McKenzie an actual chalkboard to practice her beautiful chalk art on, instead of everywhere else in our house. If you are big chalkboard fan like me, you will love these adorable Chalkboard Silhouettes that Wall Decal Tree offers as well!

When we received our decal, it came neatly rolled up with a little packet of chalk in several colors. Chalk was such a nice surprise as our collection consists of broken little pieces or worn down pieces from so much use. 

My first order of business was deciding which wall to display this lovely blackboard on. At first I planned on adhering it to her playroom closet door, however I had to come up with a different location as our doors have trim inlays which wouldn't provide the smooth surface these decals require. My second idea was to frame it out and hang it up on the wall. After struggling to find a frame the size and length that I wanted and not really wanting to assemble my own, I came up with the idea to just purchase a full length mirror and apply the chalkboard decal to the mirror giving it the framed look that I wanted! So after a quick trip to Walmart to pick up my mirror (only $11), a peel and stick party during nap time, and a little bit of conditioning to prepare it for chalk (just rub side of chalk all over board, then wipe clean), Kenzie's new framed out chalboard was ready for scribbles!
Here is my little Before & After:
I am so happy with how it turned out and I have to say the Chalkboard Wall Decal was so easy to apply and you wouldn't even know that it is a peel and stick as the quality is superb!
After conditioning or "slating" the chalkboard I couldn't help by write a little love message to greet her when she walked in :) As you can see she went straight for the chalk that I had resting on top. 
McKenzie absolutely loves her new chalkboard. She kept saying "chalk!" "chalk!" "chalk!"
This is Kenzie showing concern over her chalk that snapped in half - much like all the other pieces in her collection ;)
Broken chalk did not stop my little artist though, she continued on until her chalkboard masterpiece was complete!
I give you….."Chalkboard Scribble" by McKenzie H (with a little help from mommy)


We absolutely love our Wall Decal Tree decal and I know you will too! If your wall space is in need of a little TLC, these wall stickers are a "fun, easy and removable decor solution"! 
PROMOTION TIME!
To help get you started and to Welcome You to their fantastic online shop, Wall Decal Tree is offering all Fawn Over Baby Readers  15% OFF your total purchase!! Just use code "15OFF" at checkout to receive your generous discount!  
ENJOY!!

5/8/14

DIY: GOLD "LOVE" PRINT

It's Thursday! Just one more day of work and then your off to a wonderful weekend full of love, laughter and fun! Well, If you're like me and your fun consist of touching up a space in your home by adding a new accent piece here and there, then I have a sweet little DIY Print that will be the perfect companion for any wall, shelf or tabletop!


I'm sure you've seen these gilded gold leaf prints everywhere online. They are an absolutely adorable accent that can be displayed anywhere in your home! If you choose a phrase, message or even an animal silhouette - these prints add a perfect touch of shine and whimsy in a simplistic and chic way.

I was so close to buying a print until I found this awesome and easy How-To from Sugar & Chic! Zorrie's version is absolute perfection and her tutorial is so easy to follow. However, I wanted to use what I had laying around the house and the one thing I did not have that her tutorial calls for is the gold leaf sheets. You can find them at any craft store, however, I had a roll of Gold Foil Wrapping Paper I bought at Hobby Lobby a while back. I thought I would give it a try before I went out and bought gold leaf sheets and I'm glad I did. This print cost me $0.00 and it turned out just as cute as the prints I see for sale online. See below for my tutorial on how to create a GOLD "LOVE" PRINT using gold foil gift-wrap.

Supplies Needed:
  • White Card Stock
  • Spray Adhesive - I used a crafting glue stick that I had on hand, I suggest using spray adhesive to cut back on wrinkles. 
  • X-acto Knife
  • Cardboard or Cutting Mat
  • Gold Foil Gift Wrap

Instructions:
  1. Print Out Your Word, Message or Silhouette of Choice. I simply used Microsoft Word using font Arial Black at 660pnt.
  2. Use X-acto knife to cut out your letters making sure you stay as close to the edge of your letters as possible.
  3. Outline/Trace your card stock onto the back of your gold gift wrap then cut.
  4. Adhere your white card stock(with word cut out) onto the front of your gold gift wrap. 
  5. Don't forget the little pieces that need to be added to complete your letter.
  6. Let Dry then Frame!! ALL DONE!!

I actually ended up adding this lovely little "LOVE" print to McKenzie's Nursery as part of her wall collage. That way every morning she is met with a little bit of Love. (cheesy, I know- but I looooooove it)
Details: "Oh, the place you'll go" Print - Cheeky Albi Desings, Mirror - Target(spray painted), Letter "M" Map Print - Cheeky Albi Design, Bible Verse Print - DIY, McKenzie Newborn Photo - PropagandaAK, Love Print - DIY

I hope you enjoyed this How-To. Feel free to share your finished product via email or commenting below! Have a wonderful weekend!

5/5/14

DIY: White Washed Pallet Wall

Happy Friday Friends!!  I am so excited to share another fun weekend project for your DIY pleasure! This past Monday, I revealed McKenzie's Nursery in our new home with lots and lots of DIY decor. I received many comments and inquiries on how we made our pallet accent wall, I decided to go ahead and share it with you today. If you follow me on Instagram,  you may have seen this wall loooong before I posted our big nursery reveal. Thank you to my wonderful Fawn readers for patiently waiting on this exciting "How-To". With the help from Owen's Olivia Blog, I was able to follow her step by step instructions to successfully achieve the wall of my dreams for my daughter's room.


I have to say, it wasn't as back breaking as I thought it would be. Well, maybe that's because I enlisted my husband to do all the muscle work. With that said, I'm pretty confident that if I was left to my own devices, I think I could pull it off no problem (I think).  Well, let's get to it!!

Supplies:
  • 5-8 Pallets: maybe more, depending on your wall size. Our dimensions are 66inch wide X 84inch tall - we used 5 pallets.
  • Pressure Washer (To clean pallets)
  • Pry Bar (For disassembling pallets)
  • A bunch of 2 inch screws
  • Cordless Drill
  • White or Off White Paint
  • Paint Tray/Bucket
  • Paint Brush or Sponge or Cloth
  • Sand Paper
  • Clear Water Based Sealer
Instructions:

1. First, Clean Your Pallets! You can rent a pressure washer at your local hardware store for around $60 per day. We went ahead and bought one at Lowes for $99.
  
2. Second, Disassemble Your Pallets using a Pry Bar. Depending how weathered your nails are, those boards are pretty tough to pry apart. Pry Bar worked wonderfully for us (well, my husband)

3. After we my husband dis-assembled the pallets, I went back through and power washed the areas that were nailed to the base, as the pressure washer was unable to get to them (you can see the outline of the areas below).

4. Optional - I painted a sealer onto the back of the boards (the side that would be going against the wall) just to add a little barrier.

5. My husband then measured the wall and marked each stud. Studs should be 16 inches apart on Center (see arrows on photo below)

6. Then attach boards to your stud/wall using 2 inch screws and a cordless drill.

7. If you are blessed with a handy helper,  while your pallet boards are going up, mix your white wash paint mixture.
  
**White Wash Recipe: 
Mix 1 Part Paint X 2 Parts Water.  
(For example, If you use 1 oz of paint, use 2 oz of water)

8. Paint your white wash mixture onto boards after they are all attached. I started off using a staining cloth to apply, then switched over to a paint brush and it worked just as well.  

**Depending on how much wood you want to show through, you may want to apply several coats or just use less water.  I wanted mostly white with a little wood grain showing through, so I used 3-4 coats. In the photos below you can see the little bit of difference a few more coats make.

9. After paint dried, I used sand paper to give it a bit more of a worn look and to sand away any splinter hazards.

10. After sanding, I applied water based Polycrylic to seal the paint and give the boards a smoother finish. Let it dry and YOUR ALL DONE!!!

Now sit back and marvel at your rustic masterpiece!  I couldn't stop staring at this wall for days, so don't be embarrassed if you find yourself walking into your room more than usual - Just to take another peek!!  :)

Decor Details: Pallet Wall - DIY, Deer Head - White Feaux Taxidermy, Personalized Wooden Flag Letters - New Arrivals Inc (Use FawnOverBaby20 for 20% Off Thru April), Crib - Restoration Hardware Baby & Child (Discontinued), Bedding - Pottery Barn Kids (Discontinued)

I hope you enjoyed this How-To and I can't wait to see your Pallet Wall Come To Life!  Feel free to email me your rustic wall charmer at fawnoverbaby @ gmail.com or leave a comment below letting me know how your pallet wall journey is going!!

3/3/14

DIY - Paper Mache Alphabet Art & Michael's Gift Card Giveaway!

It's Monday again. I swear it feels like just yesterday I was sending you all off to a wonderful weekend with a beautiful maternity session. Where does the time go? Well, I know where my time went. I spent my weekend working on a fun DIY Wall Art Project for my little one's room. As I mentioned in my "DIY Chalkpaint" tutorial a few weeks ago, I am on a mission to get McKenzie's room up and running with exciting elements to wake up to and play in every day. Poor thing, she wakes up every morning and is met with bare walls and a changing table.  Lately I haven't wanted to touch the walls until I figure out what I plan on doing with them.  I'm sort of over the whole patching and painting process these days. After we moved in and began making our new house a home, I couldn't seem to commit to any of the wall decor that I enlisted my husband to help hang, so ALOT of patching and painting took place. When it came to McKenzie's room, I decided to do nothing until I could make a call and stick with it (fingers crossed). 

The One thing that I am certain of today, is this ADORABLE Alphabet Wall Art that I found over at Crafts Unleashed! As soon as I stumbled upon it on Pinterest, I knew that I had to at least attempt it and add it to Kenzie's room decor list! I love how clean and crisp it looks, not to mention my little one will be met with the Alphabet every morning and afternoon following nap time.  I'm so thankful that McKenzie LOVES her crib. When she wakes up in the morning and from her afternoon naps, she plays for a good length of time and has little chit chats with her stuffed animals that sit at the foot of her crib. Hopefully this will continue and as she gets more and more familiar with her ABCs, she will spend her time looking over at her Alphabet Art and practice away her letters! Well, that's my make-believe mommy vision anyway (wink). 

So I basically followed every step of Vanessa's from Crafts Unleashed.  The only thing I did differently was add a little bit of sparkle to our alphabet display in hopes to coordinate with other decor elements I plan on adding. (Nursery Reveal Coming Soon!) Soooooo with out further ado, here is my shared tutorial on:


How To Create Your Own Paper Mache Alphabet Art


 Supplies:
Optional:

Instructions:

1. Optional - I chose to lay my letters out beforehand and move them around until I was happy with the layout. Be sure to take a photo as a reminder :)

2. Remove barcode sticker then spray paint your letters, except for the "I", "Heart" & "U".  I just sprayed the front of each letter (back is optional as it will not show)

3. Once they are dry, lay them back in your preferred layout. Vanessa left her "I", "Heart" & "U" the natural color they came in. I absolutely love the natural surrounded by all the white. It makes for such a clean finish! 

4.  Although I LOVE the natural look, I decided to add a little bit of sparkle to our "I Heart U" message. This is totally optional and just adds this one extra step. You can find this quick and easy tutorial here.

5. Once All Letters & Heart are dried. Lay them back out to your preferred layout. I chose to hot glue the sides that meet together.

6. Once the hot glue dried, I turned my alphabet over (recruit help or it will be a mess) and began to hot glue the letters together from the backside as well to create more support.

7. (Not Pictured) - I then added two saw hook hangers between the "B" & "C" and "E" & "F". I pushed them in and covered the anchors with hot glue for extra support.
THAT"S IT!!!
 Just hang up and feel free to start singing "A B C D E F G...."

Please Feel Free to To Give This Tutorial A Try and Share Your Results! Let Me Know How Well It Worked For You or If There Is Anything You Would Do Differently!

*******
GIVEAWAY!
To Help You Get Started On Your DIY Paper Mache Alphabet Art, I have teamed up with these wonderful ladies to GIVEAWAY A $100 Gift Card To Michaels!!! 

!!!YEY!!!! 

All You Have To Do, Is Fill Out The Lovely Rafflecoptor Form Below For A Chance To Win!
a Rafflecopter giveaway

2/11/14

DIY: Glitter Gold "I LOVE YOU" Paper Mache Message

Valentine's Day is fast approaching and I have been scrambling for something unique and fun to give to my husband on this special "love" day. I searched through Pinterest and I stumbled upon a few Baby Valentine photo sessions that are toooo cute and thought that would be a perfect Valentine's Day surprise for him! However, since we are new to the area and are not familiar with any local photographers yet, I decided to do a little crafting and create a simple and sweet Valentine's Day Photo Session At Home. With a little DIY prop and a dolled up McKenzie, our Valentine To Daddy will be the perfect way to let him know that he is loved!

I know Valentine's Day is most commonly associated with the colors Red and Pink, however, I wanted to take a simpler approach and keep it neutral and just add a touch of sparkle! With that in mind, I decided to create an "I Love You" message using paper-mache letters and Gold Glitter Spray Paint! I know, I know-I had no idea that Gold Glitter Spray Paint existed! So exciting, right?


To create your Glitter Gold "I Love You" Paper Mache Message,  below is my simple how-to:

Supplies:


  •  8" Paper Mache Letters & Heart
  • Krylon Glitter Blast: Golden Glow
  • Krylon Glitter Blast: Clear Sealer

  • Instructions:
    • The heart actually came as a heart -shaped box. I just used one lid portion and cut the edges off.
    • Now, just spray your Glitter Blast Golden Glow over entire front surface (You may spray back surface - I didn't as I don't plan on showing it). Let Gold Layer Dry Completely.
    • Next, Spray a layer of Clear Sealer. This helps the Glitter stay in place without flaking off everywhere (which is why my husband is not a huge fan of glitter). Let Dry Completely
    • That's It! You're DIY- Glitter Gold Message is sparkling and ready to display!
    These can easily be set-up as Valentine's Day Decor on a shelf or hung up as wall art for the week. I plan on doing just that, now that McKenzie's Valentine photos are ready. 

    Here are a few that I was able to capture before my little busy body couldn't contain herself anymore and began waving her heart around and biting on the edges. Probably not the safest thing to let her do, however, no harm was done and luckily no glitter was found in her diaper the next morning. ;) ( I allowed her to handle for a only few seconds- perfect amount of time to get a few shots)


    McKenzie's Outfit: Headband(Love Crush Boutique),  Dress(BabyGap-unfortunately sold out), Moccs(Freshly Picked) 

    6/21/13

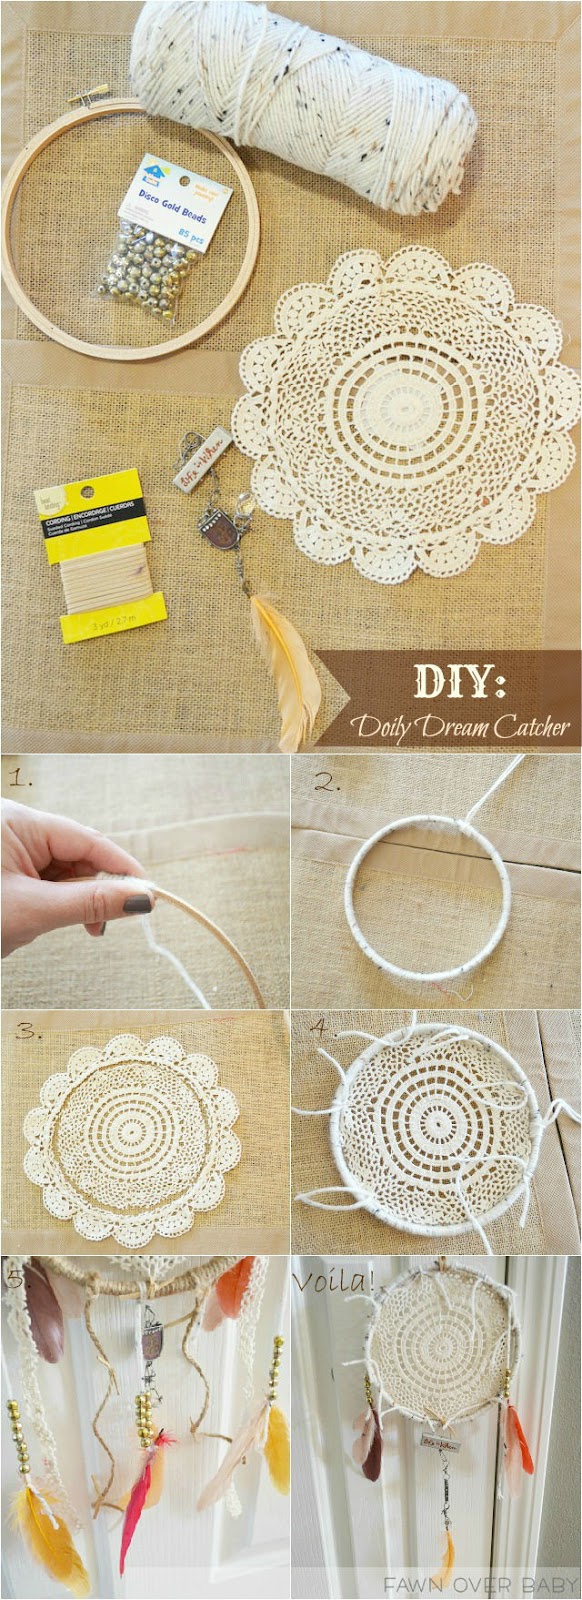
    DIY: Doily Dream Catcher

    Hello My Dears! Today I am sharing one of my many DIY projects that I have been working on this past week. With the tribal theme taking over my collection of inspirational designs and photos that are neatly filed away on my computer, I couldn't help but jump on the bandwagon and start incorporating it into my daughter's sleep and play area. Since McKenzie does not have a mobile anywhere in her nursery, I decided to start off my DIY extravaganza with a Dream Catcher. Dream Catchers originated in traditional indian beliefs and were hung above one's bed(mostly children) to protect them from bad dreams.  There are a ton of wonderful Dream Catcher tutorials out there, however a lot of  them include the very cool webbing technique that is threaded through the center. If you are like me and don't have the time to learn how-to web, many DIYers are using doilies! What a genius idea right? After searching and searching, I came across this awesome tutorial from Calico Skies and in an instant this overwhelming diy-confidence came over me and I dove right in! Here is how I assembled mine with a little help from Lauren at Calico Skies of course.

    Supplies:
    • Doily -  Smaller size is preferred. I found mine in a vintage cream color at JoAnn's. If only whit is available, see Lauren's tutorial
    • Craft Hoop - Metal is preferred, however, all I could find were the wooden embroidery hoops at JoAnn's (you get to make two out of these)
    • Yarn or twine - I used a natural looking yarn for one and twine for the other.
    • Beads - color and shape of your liking. Make sure the hole is big enough to fit yarn, twine or leather cord through.
    • Leather cord - I went with a lighter shade. 
    • Feathers - can be bought packaged or individually at JoAnn's and Michaels
    How To:
    1. I started by simply wrapping the yarn tightly around one of the wooden hoops-tying at the end
    2. I then created my hanger by tying a loop knot with yarn or leather cord at the top
    3. I had to cut the trim off of my doily as it was too large for my hoop. 
    4. I placed the doily in the center of the hoop and began stretching and tying four outside edges of the doily to the loop. (I just left the extra tails from the knots to create a more frilly look.
    5. I then tied and hung leather strips, twine and yarn from the sides and bottom of the loop and attached beads and feathers or any other embellishments of your choosing(The more, the merrier)
    6. Voila! You are now ready to hang your dream catcher anywhere your heart desires. 


    If you do not have the time or interest in making your own, visit Moons & Junes on Etsy. Shop owner and talented mom, Shayla, makes and sells amazing dream catchers as well as beautiful mobiles to adorn your child's nursery or bedroom!

    4/8/13

    DIY: Twine-Wrapped Initials

    So I know we've all seen the adorable wooden letters wrapped in burlap, yarn & twine. I am just like everyone else, I found a tutorial on Pinterest and couldn't wait to get started. For some reason or another, I couldn't make it to my local craft store to purchase all the necessities. I was also pregnant at the time and I couldn't wait another day to make my daughter's initials to mark her space in her duel purpose nursery.  Did I mention I was pregnant? Patience was not my strong suit in those days, so I searched around the house to find what I could to get this project up and running. I found twine left over from our wedding, a cardboard box in the garage and I printed off a big letter "M" and a big letter "H" from our computer.  One thing lead to another and I finally had my daughter's initials twine-wrapped and tastefully hung.  I like to call this my "budget-consious d.i.y". I hope you find it easy and inspiring, especially for those days you just can't leave the house or more importantly don't want to ;)


    Materials Needed:
    1. A piece of a cardboard box cut to size of your individual letters
    2. Twine, yarn or ribbon (which ever you perfer)
    3. Scissors
    4. Pencil (dark enough to see on box cut out)
    5. Hot glue gun or a strong glue substitute
    6. Print out of your individual letters (I used Word/Cambria Font/650 size) - you may need to play with your ruler settings to keep from cutting off your letter
    ***Instructions are in captions***

    Start by cutting out your letters
    Trace your letters on to cardboard cut-out
    Cut both of the letter traced cardboard cut-outs
    If you would like a hanger, punch a hole at the top of the left and right section of your letter and tie your hanger.
     If not, you may glue your hanger to the back when completed. Since they are not that heavy,  glue should be strong enough.
    Glue a dot on the back of the letter and press the end of the twine down until dried
    Then wrap around front
    Then wrap around back - continue until this section is completely wrapped.
    As you wrap, glue dot along the way and wrap twine pretty snug up against each other preventing gaps
    Once wrapped, glue the end down and tuck in between layers
    Make sure to cut off your twine with the end finishing on the back of your letter. 
    The front should be pretty clean
    (I wouldn't worry about the back if it's strictly for decorative purposes, no one will see it)
    Repeat steps for all of the vertical sides of letter (this adds a better finish in the end)
    Start at the top of one side and begin to wrap down horizontally until you get to a split in the letter
    Once you hit the split continue to wrap down the outside section of the letter first. 
    To finish the remaining sides, start at the top and wrap your way down
    When you hit the bottom just continue to wrap horizontally then glue loose pieces closed.
    If you find a few loose strands, just pinch them together to hide the gap then glue
    I added a few little flowers (left over from wedding accouterment) to dress them up a bit :)

    You now have your adorable twine-wrapped initials to beautifully adorn your space :)
    Related Posts Plugin for WordPress, Blogger...

    Blog Design by Get Polished